Related Post
ChIP-Seq Troubleshooting 101: Fix Low Signal Step-By-Step
2026-02-28ChIP-Seq Troubleshooting often starts with one simple symptom—low signal—but the real causes are usually spread across chromatin quality, antibody performance, immunoprecipitation conditions, and library QC. At Longlight Technology, we support labs that run ChIP-Seq for histone marks and transcription factors, and we see the same "quiet failure points" repeat across different instruments and sample types. This ChIP-Seq Troubleshooting 101 guide walks beginners through a step-by-step path to recover signal in a logical order, using practical checkpoints you can verify in a single run.
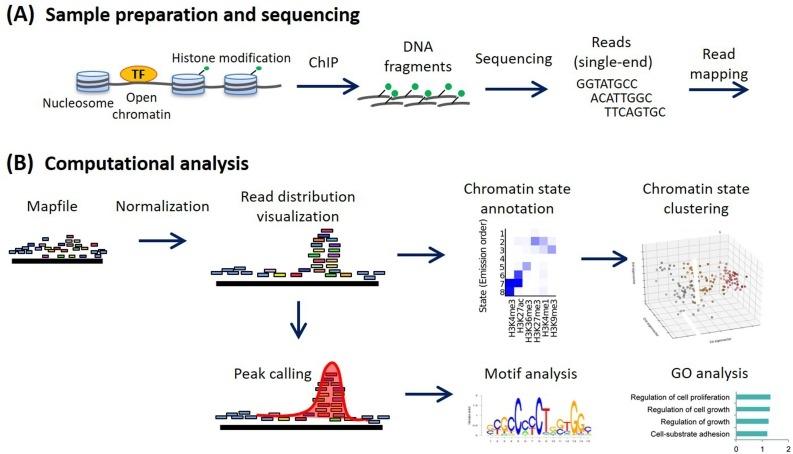
Methods for ChIP-seq analysis: A practical workflow and advanced applications - ScienceDirect
1) Define "Low Signal" Before You Change Anything
Low signal can mean different things: too few peaks, weak enrichment at known loci, or a library that looks fine but maps poorly. Good ChIP-Seq Troubleshooting begins by labeling the failure mode clearly, because each mode points to different fixes.
A beginner-friendly way to define the problem is to check three layers:
✓ Biology layer: Is the target present in your cell state (stimulated vs resting, differentiation stage, treatment timing)?
✓ Enrichment layer: Does ChIP DNA show enrichment by qPCR at a positive control locus versus a negative region?
✓ Sequencing layer: Do you have enough unique, mapped reads and a reasonable duplicate level?
If you cannot answer these three, do not "optimize everything." Run one controlled experiment first: keep the sample the same, keep the sequencing depth modest, and change only one suspected variable.
2) Start With Chromatin: Fragment Size and Loss Control
When labs ask why a ChIP "doesn’t work," the most common root cause is chromatin that is over-fragmented, under-fragmented, or simply lost during cleanup. In ChIP-Seq Troubleshooting, chromatin is your foundation—if it is inconsistent, every later step becomes noise.
For sonication-based workflows, many labs aim for fragments in the ~150–300 bp range for sharp peak calling and consistent immunoprecipitation. If fragments are mostly larger (for example, >500 bp), antibodies struggle to pull down target complexes efficiently. If fragments are too small, you may destroy epitopes or increase background by releasing non-specific DNA.
Practical checkpoints you can do immediately:
• Measure DNA after reverse crosslink and cleanup (not only before IP). A big drop here signals loss in beads/columns or harsh conditions.
• Compare fragmentation profiles across samples. If one sample is "perfect" and the next is smeared or oversized, focus on lysis and sonication settings, not antibody first.
• Keep an "input DNA" aliquot from every batch. This is your baseline for both qPCR and library QC.
At Longlight Technology, we recommend treating chromatin prep like a controlled manufacturing step: fix buffer composition, keep sample temperature stable during sonication, and record the exact cycle settings. Small deviations create large differences in peak strength later.
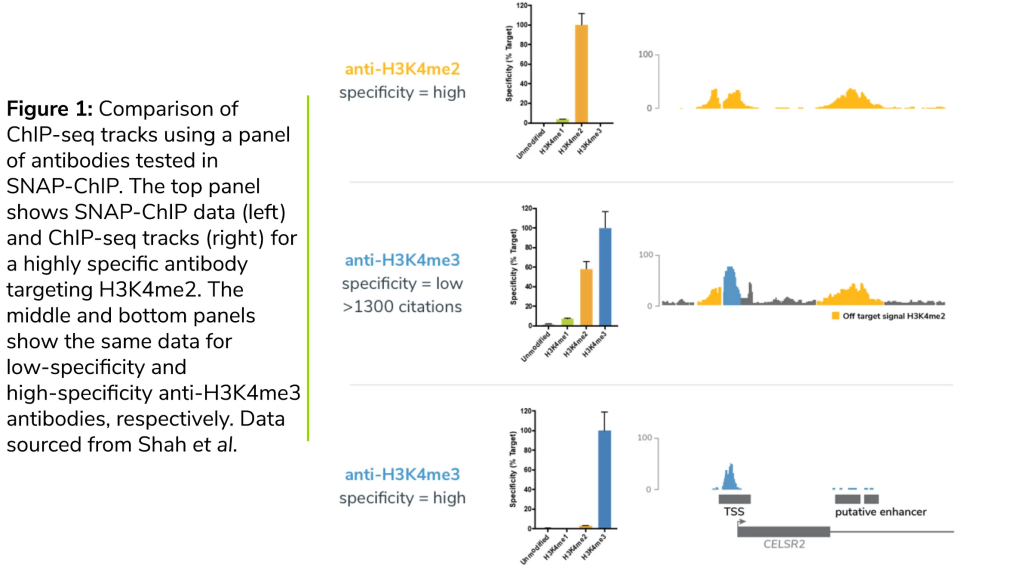
3) Antibody Fit: Specificity, Lot Variation, and Controls
If chromatin looks reasonable, the next step in ChIP-Seq Troubleshooting is antibody selection and validation. Low signal is often caused by using an antibody that is "good for western" but weak for ChIP, or by lot-to-lot variability.
A good antibody strategy is built around controls:
✓ Positive control target: a histone mark with robust enrichment (commonly used to confirm workflow health).
✓ Negative control: IgG or an isotype control to estimate background pull-down.
✓ Known loci qPCR: one or two published positive loci for your target, plus a gene desert region.
For transcription factors, signal can be inherently lower than histone marks. That means your antibody must be high-affinity and your IP conditions must be clean. If you are new to TF ChIP, do not start by changing sequencing depth. First confirm enrichment by qPCR. If qPCR enrichment is weak, more reads will mostly give you more noise.
Practical tip: When you switch antibody lots, re-check enrichment on the same chromatin batch if possible. If the lot change breaks signal, the workflow is not necessarily "wrong"—your reagent performance changed, and your troubleshooting path should reflect that.
Choosing the Right ChIP Antibody for Your Experiment - EpiCypher
4) Clean IP Optimization Sequence—No Guesswork
Beyond chromatin and antibody, IP chemistry (beads, washes, incubation) is the next hotspot. Low signal is often a background problem.
✓ Bead selection: Pick Protein A/G that suits your antibody species/isotype.
✓ Antibody amount: Titrate to avoid weak pull-down or elevated non-specific DNA.
✓ Wash balance: Calibrate stringency to remove noise yet preserve weak but real interactions.
A practical beginner rule is to adjust only one axis per run:
• If peaks exist but are weak, increase effective capture (slightly more antibody, improved bead binding, longer incubation).
• If peaks are broad and noisy, increase specificity (stronger washes, better blocking, reduce antibody overload).
From a manufacturer perspective, Longlight Technology designs immunoprecipitation reagents and magnetic bead systems to minimize loss during handling, because sample loss looks exactly like "low signal." Smooth bead separation, consistent binding, and clean wash steps reduce variability between operators—especially important for teams training new staff.
5) Library QC: When "Good DNA" Still Gives Low Signal
Sometimes ChIP DNA enrichment is real, but the final data still looks flat. In ChIP-Seq Troubleshooting, this usually points to library construction or sequencing metrics.
Common library-level causes of low signal:
✓ Over-amplification: too many PCR cycles can inflate duplicates and reduce usable unique reads.
✓ Adapter/primer artifacts: these consume sequencing reads without improving target coverage.
✓ Poor complexity: often caused by very low ChIP DNA input or loss during cleanup.
What to check before you re-run the entire ChIP:
• Library size distribution (you want a clean peak, not multiple unexpected peaks).
• Duplicate rate and unique mapping rate after alignment.
• Fraction of reads in peaks (FRiP) trend relative to your internal baseline (even beginners can track "better vs worse" across runs).
If you suspect library over-cycling, a simple improvement is to reduce cycle count and increase capture efficiency upstream (better chromatin recovery and IP specificity). Sequencing deeper cannot compensate for a low-complexity library.
6) Step-By-Step Signal Recovery You Can Start Tomorrow
A practical sequence that outperforms ad-hoc tweaking:
✓ Step 1: Verify chromatin fragments are ~150–300 bp and confirm DNA recovery post reverse crosslink.
✓ Step 2: Check enrichment by qPCR at one positive and one negative locus prior to library preparation.
✓ Step 3: Add proper controls (input + IgG) to separate "no enrichment" from "high background."
✓ Step 4: Tune IP conditions one variable at a time (beads, antibody amount, wash stringency).
✓ Step 5: Audit library metrics (duplication, mapping, size distribution) before assuming sequencing depth is the problem.
CTA (Longlight Technology): If you want a faster path, contact Longlight Technology for a ChIP-Seq Troubleshooting checklist and a sample-by-sample diagnostic worksheet (chromatin → IP → library). We can also recommend a control design and reagent pairing strategy to reduce operator variability and help beginners reach stable enrichment sooner.
Low signal is frustrating, but it is rarely mysterious. With a disciplined ChIP-Seq Troubleshooting flow—starting from chromatin integrity, then antibody fit, then IP specificity, and finally library QC—you can turn one weak run into a repeatable protocol that scales across samples, staff, and projects.